

Most of the time we want to allow users to connect to our application using google identity provider, because Gmail is so popular, that almost every user has it. So that means we can provide an easy way to login to our application without entering boring registration data. On top of that many Gmail users uses google services more than just accessing email. Think about users who have Android devices, they use the entire Google ecosystem like calendars, email, reminders, tasks, and of course office documents. So in many cases, we want to enrich our application and access those resources on behalf of the end-user. To help you out we covered all tedious work and allow you easily connect your application with Google.
STEP 1 – Create an application with your Google (or G-Suite) account
Go to Google developers console and login with your Google account.
Once logged in, create a new project.
After the project is created, navigate to OAuth consent screen in APIs & Services sub-menu.
Configure the consent screen. Fill all the details based on your application. Add the scopes if you going to use Google APIs. If you add more sensitive scopes and make your application public, you will have to submit your app for verification. You can still develop your app without verification, but you will see “unverified app” screen during authentication.
Once consent screen is created, go to Credentials page.
In credentials page click in Create Credentials and select OAuth client ID.
For application type choose Web application.
Under Authorized redirect URIs add
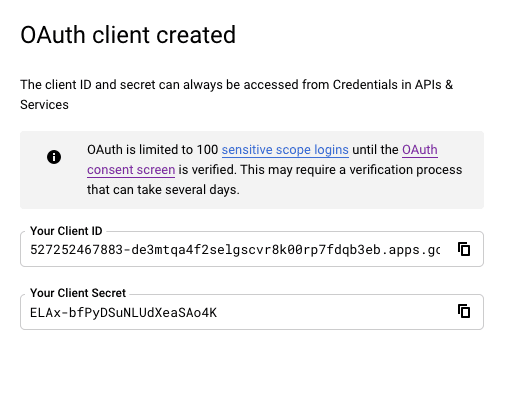
https://api.codemash.io/auth/google. If you plan on using CodeMash forms, also add this:https://hub.codemash.io/shared/forms/auth/google.Now you will get Client ID and Client Secret. This is how it looks like at the end
STEP 2 – Connect Google application with CodeMash
Once you have your project, you can connect your Google application to CodeMash.
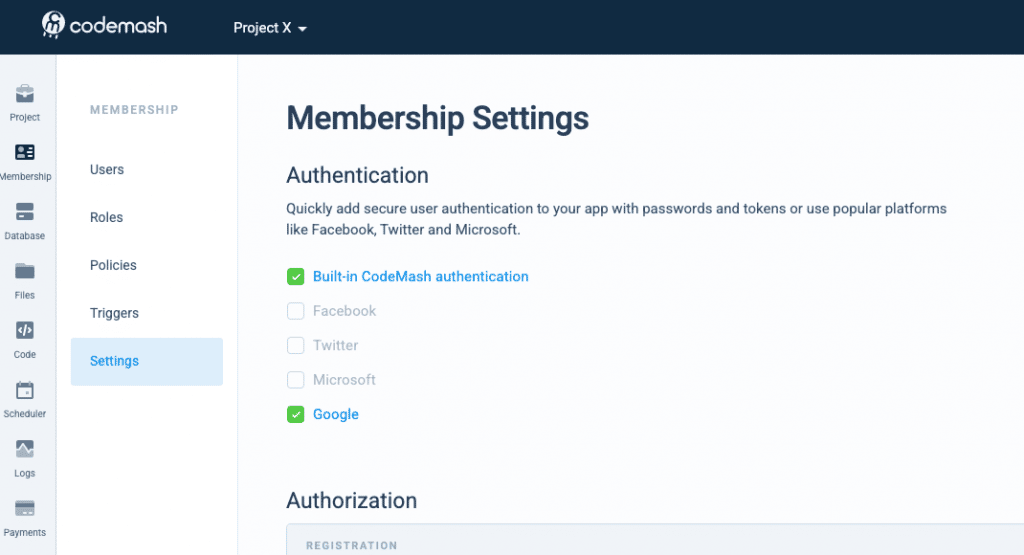
Navigate to your Project > Membership > Settings. Here select Google.
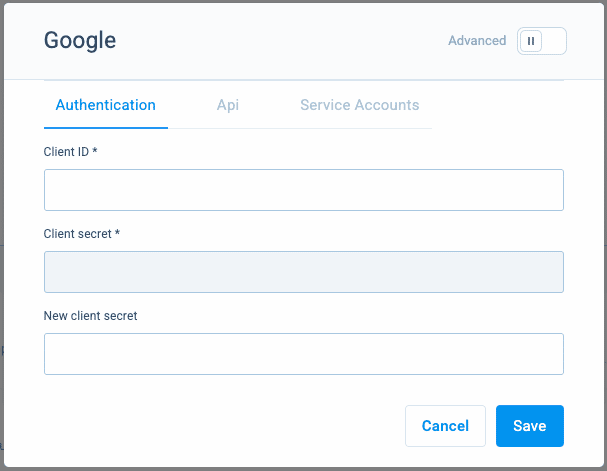
A modal will show. In here fill required fields:
Client ID – your created Google OAuth client ID.
Client Secret – your created Google OAuth client secret.
Other recommended fields to fill out:
Callback URL – after successful login, the user will be redirected to this URL.
Logout URL – after successful logout, the user will be redirected to this URL.
Failure URL – after failed login, the user will be redirected to this URL.
After you have configured the fields above, you can also configure scope which will allow calling Google API to work with your users’ Google details.
Congratulations, you have established connection between Google and CodeMash. In case you have more advanced topics to cover, please follow our technical documentation.